Jenkins Build Status on Arduino

I gifted myself an Arduino Starter Kit from Simplelabs to kill some time during the weekends. Needless to say, I felt really proud of myself once I got the LED blink example working without breaking anything.

My next project was a simple Jenkins build monitor, very popular amongst the Arduino beginners out there who write code.

Here is my version of this hack. In addition to the usual ‘traffic light’, I also plonked on a 16x2 LCD to the circuit which displays the build number along with the status. Scroll down to the end of this post to see this in action.

Schema

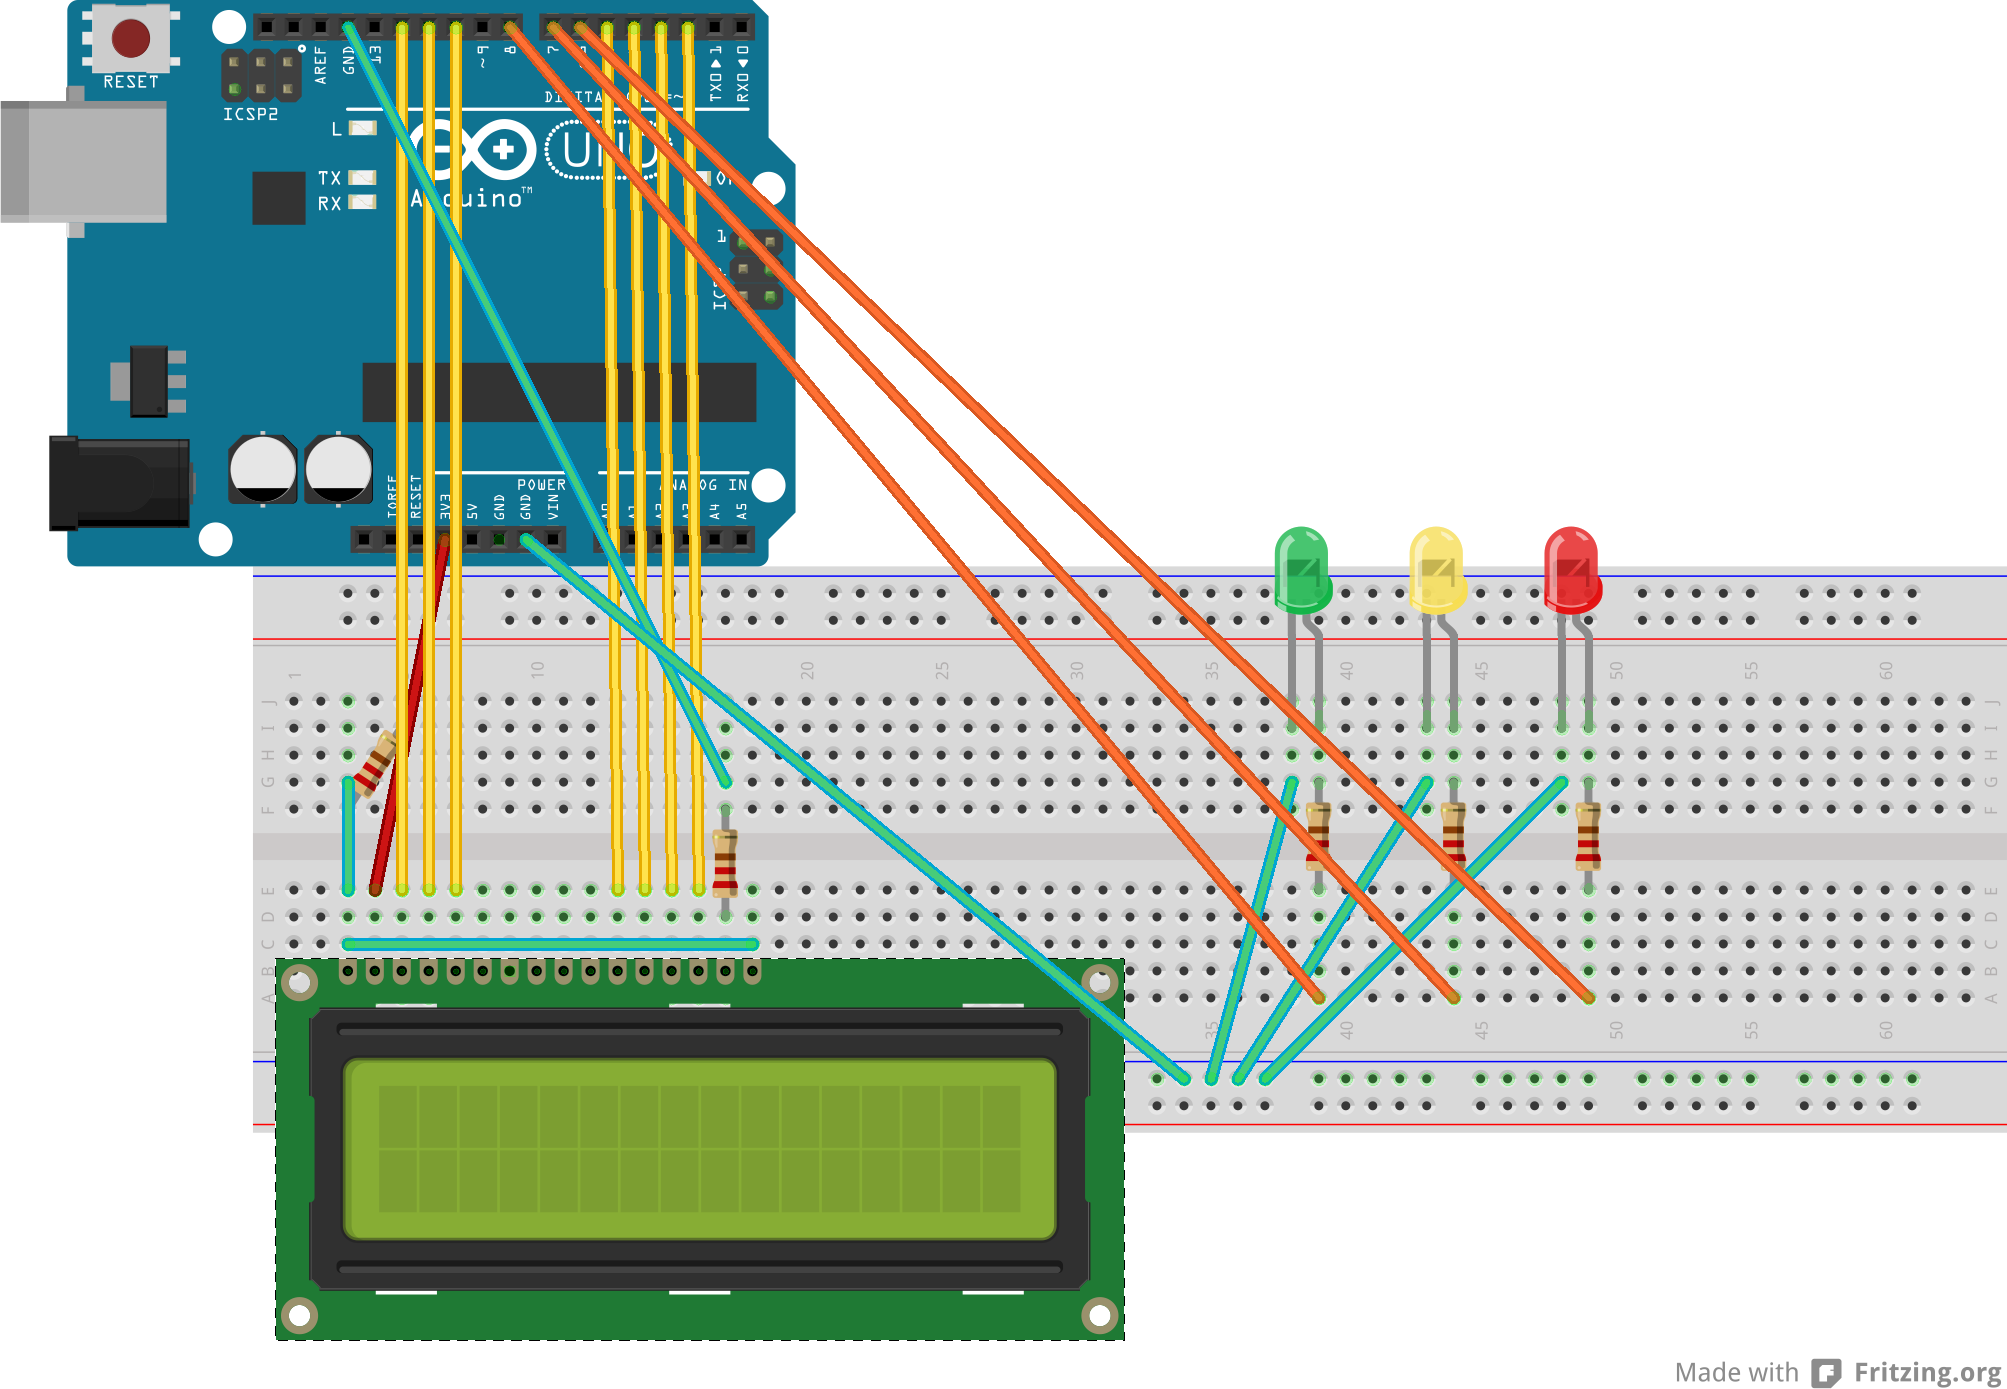
I used Fritzing to draw this schema and I know it’s a little bit ugly.

Anyway, successful builds turn on the Green LED; Unstable builds, yellow; Failed builds, red and my favorite of all, builds in progress makes the LEDs turn into KITT from Knight Rider :P.

Code

The code is pretty simple. There is a Python script that uses the Jenkins REST API to get the latest build and its status for a given a job. This is translated into a crude command for the Arduino board to pick up using the Serial interface.

Python side of things

(jenkins_status.py) download
1
2
3
4
5
6
7
8
9
10
11
12
13
14
15
16
17
18
19
20
21
22
23
24
25
26
27
28
29
30
31
32
33
34
35
36
37
38
39
40
41
42
43
44
45
46
47
48
49
50
51
52
53
54
55
56
57
58
59
60
61
62
63
64
65
66
67
68
69
70
71
72
73
74
75
76
77
78
79
80
81
82
83
84
85
86
87
88
89
90
91
92
93
94
95
96
97
98
99
100
101
102
103
104
105
106
107
108
109
110
111
112
113
# Copyright 2013 Sudharshan S
# This work is free. You can redistribute it and/or modify it under the
# terms of the Do What The Fuck You Want To Public License, Version 2,
# as published by Sam Hocevar. See http://www.wtfpl.net/ for more details.
import sys
import time
import glob
import os

import serial

from jenkinsapi.jenkins import Jenkins

led_states = {
    "BLINKING": 2,
    "ALWAYS": 3,
    "OFF": 4
}

led_pins = {
    "RED": 6,
    "YELLOW": 7,
    "GREEN": 8
}

# LED behaviour for each Jenkins State
jenkins_states = {
    "SUCCESS": {"GREEN": "ALWAYS"},
    "FAILURE": {"RED": "ALWAYS"},
    "UNSTABLE": {"YELLOW": "ALWAYS"},
    "RUNNING": {
        "GREEN" : "BLINKING",
        "RED"   : "BLINKING",
        "YELLOW": "BLINKING"
    },
    "NOT_BUILT": {
        "YELLOW": "BLINKING"
    }
}


def ttymodem(baudrate=9600):
    # Change this Glob if you are using Linux
    devices = glob.glob("/dev/tty.usbmodem*")
    if not devices:
        raise Exception("Probably modem not connected")
    board = devices[0]
    return serial.Serial(board, baudrate=baudrate)

def connect(url, job):
    print "Connecting to the jenkins url: {0}".format(url)
    j = Jenkins(url)
    return j[job]

def write(board, command, msg, padding=16):
    padded = msg.ljust(padding)
    # The first character of every line that is sent to the board
    # is a 'command' that will be read by the Arduino Sketch to do
    # something
    message = "{0}{1}\n".format(command, padded)
    print "Writing message --{0}--".format(message.strip())
    board.write(message)

def get_leds(build_state):
    """Given a build state, get the line messages to be sent to the board
    For now, just handle RUNNING, FAILURE and SUCCESS builds"""
    commands = []
    if build_state not in jenkins_states:
        return commands
    led_behaviour = jenkins_states[build_state]
    for led_color, led_state in led_behaviour.items():
        pin = led_pins[led_color]
        state = led_states[led_state]
        commands.append(pin)
        commands.append(state)
    return commands

def loop(board, job, poll_interval=15):
    print "Sleeping for a bit"
    time.sleep(1)
    print "Poll interval set to {0}".format(poll_interval)
    while True:
        build = job.get_last_build_or_none()
        if not build:
            print "No build found"
            continue
        build_status = build.get_status()
        if not build_status:
            build_status = "RUNNING" if build.is_running else "QUEUED"
        status = "{0} - {1}".format(build_status, build.get_number())
        print "Writing build status {0} to the board".format(status)
        write(board, 1, status)
        led_commands = get_leds(build_status)
        for c in led_commands:
            write(board, c, "", padding=0);
        if build_status in ["RUNNING", "NOT_BUILT"]:
            # Continuosly bombard the board with the
            # blink commands. Looks Knight Riderish
            pass
        else:
            time.sleep(poll_interval)

if __name__ == '__main__':
    # Run this like so
    # python jenkins_status.py <jenkins_url> <job_name>
    # eg: $ python jenkins_status.py https://builds.apache.org Kafra
    url = sys.argv[1]
    job_name = sys.argv[2]
    board = ttymodem()
    job = connect(url, job_name)
    write(board, 0, job_name)
    write(board, 1, "Connecting...")
    loop(board, job)

The ‘Sketch’

(jenkins.ino) download
1
2
3
4
5
6
7
8
9
10
11
12
13
14
15
16
17
18
19
20
21
22
23
24
25
26
27
28
29
30
31
32
33
34
35
36
37
38
39
40
41
42
43
44
45
46
47
48
49
50
51
52
53
54
55
56
57
58
59
60
61
62
63
64
65
66
67
68
69
70
71
72
73
74
75
76
77
78
79
80
81
82
83
84
85
86
87
88
89
90
91
92
93
94
95
96
97
98
99
100
101
102
103
104
105
106
107
108
109
110
111
112
113
114
115
116
117
118
119
120
121
122
123
124
125
126
127
128
129
130
131
132
133
134
135
136
137
138
139
140
141
142
143
144
145
146
147
148
149
150
151
152
153
154
155
156
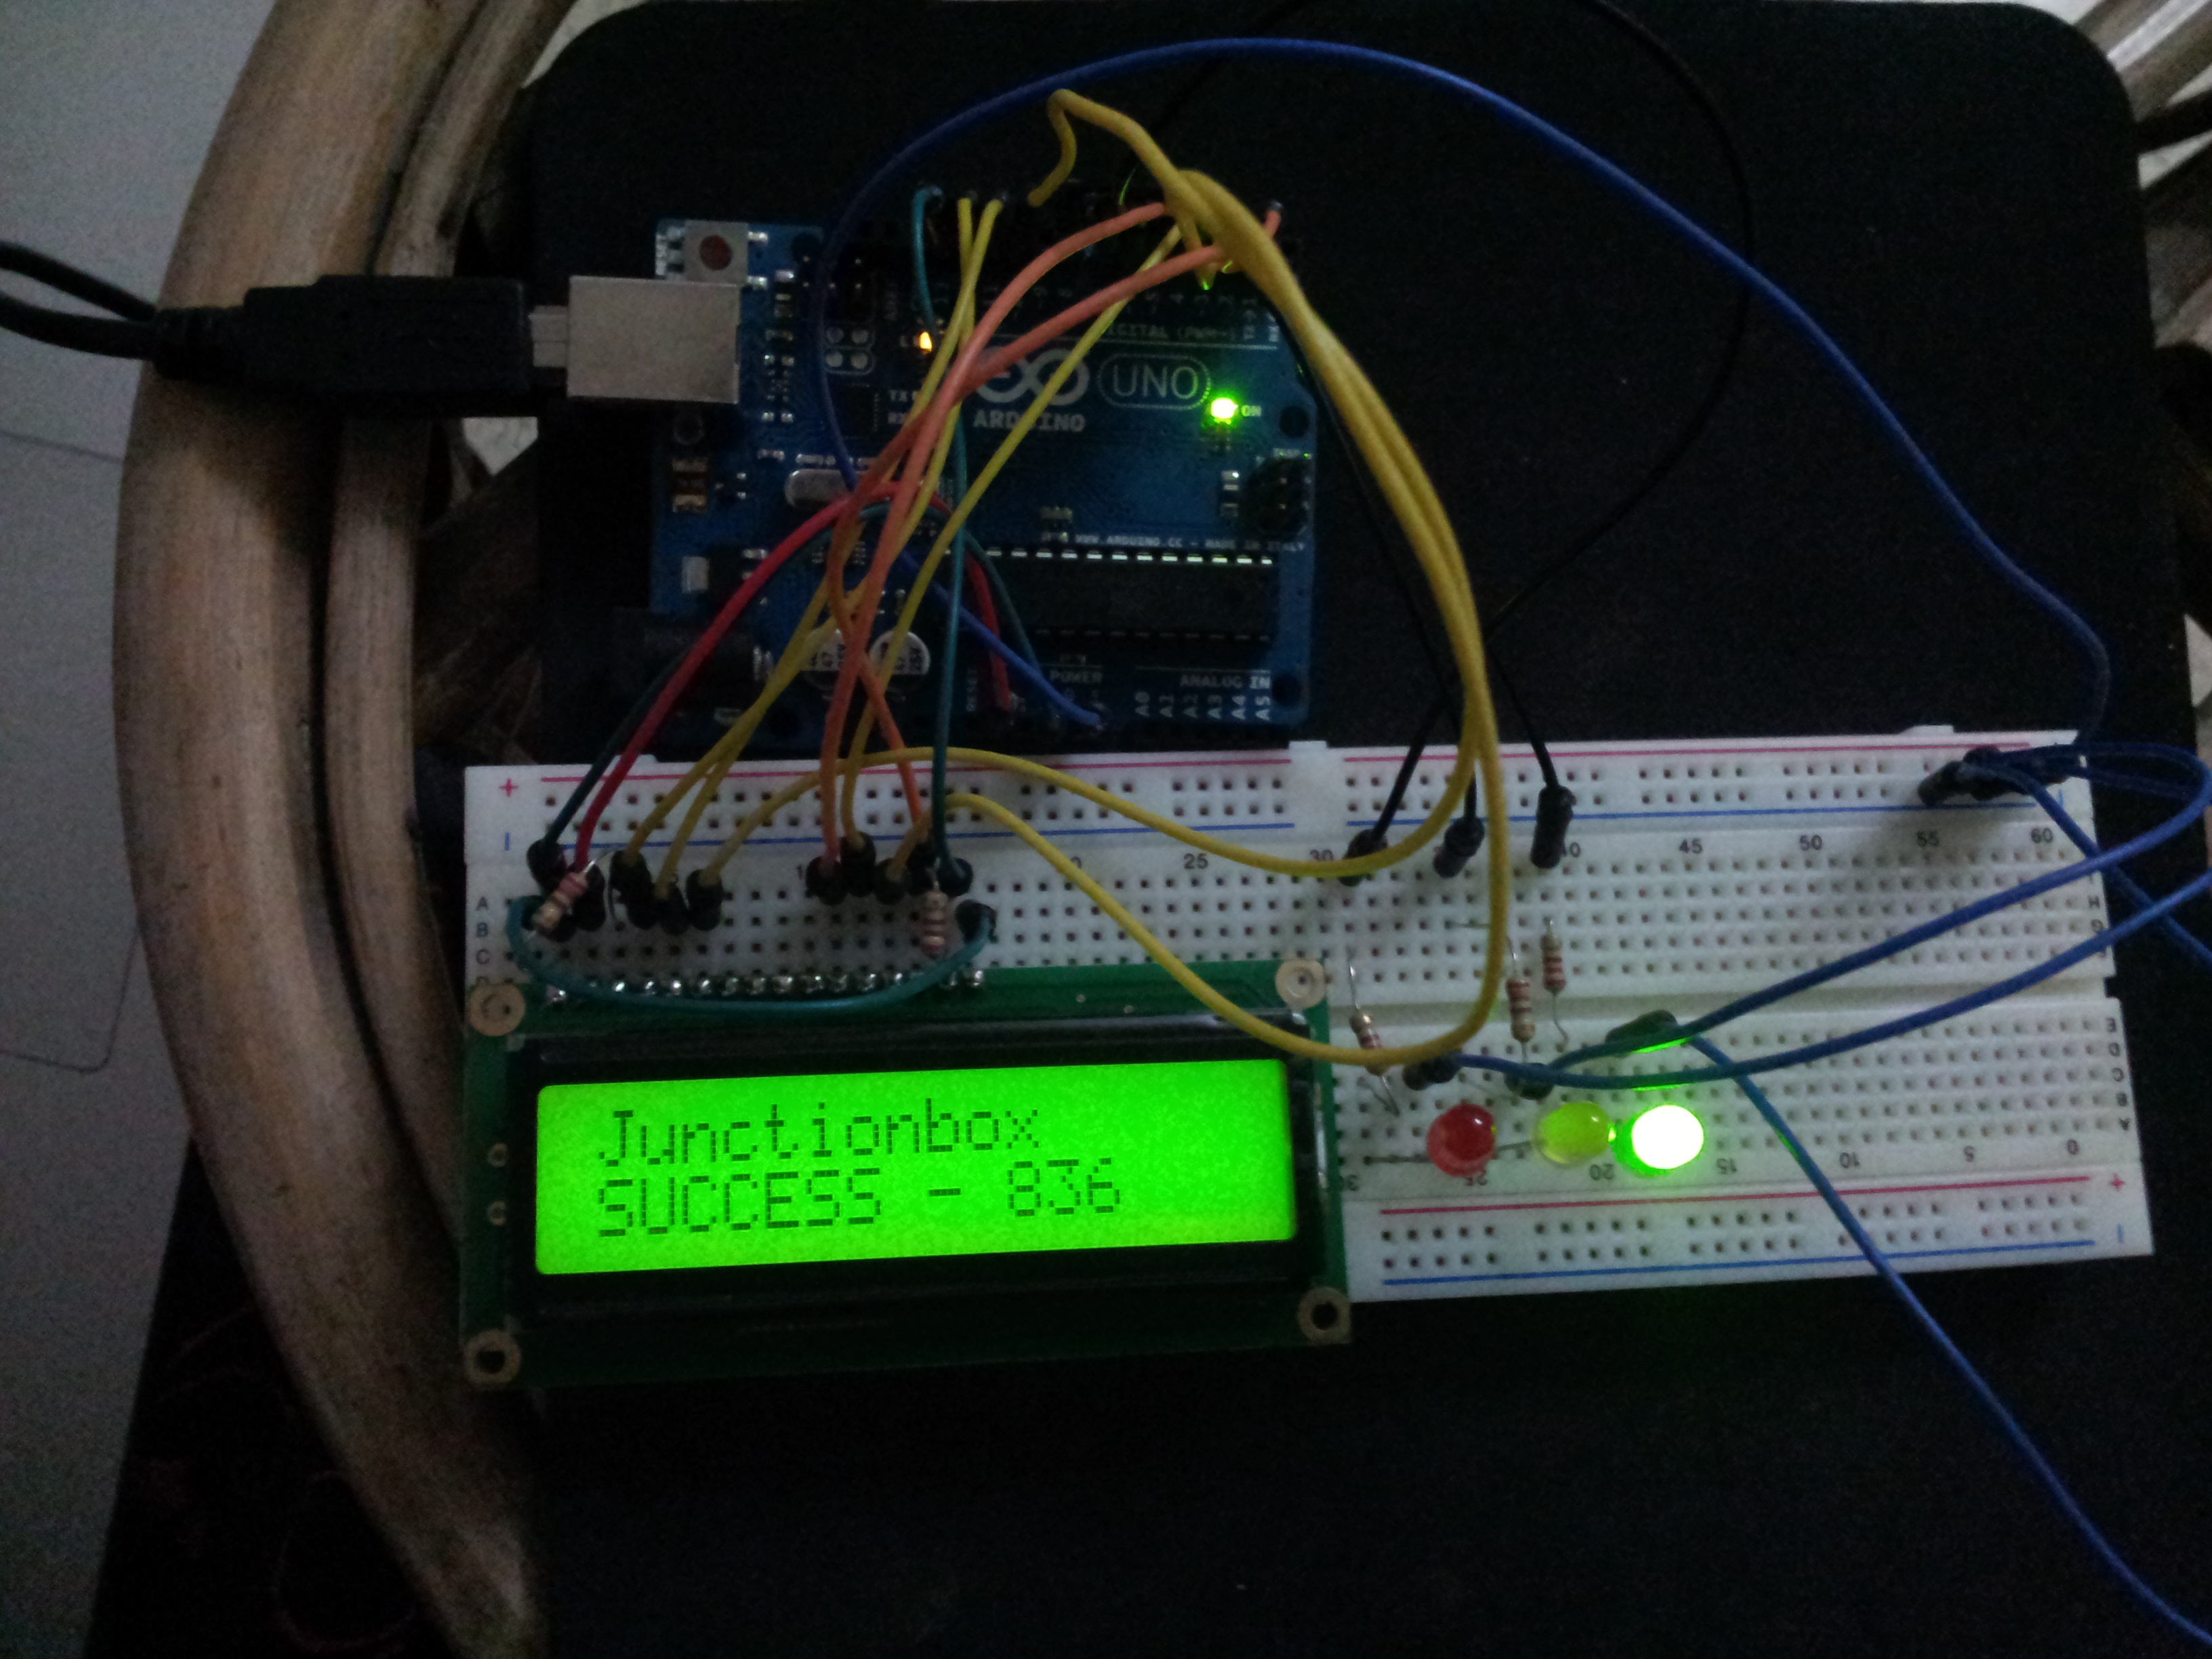
/*
  Copyright 2013 Sudharshan S
  This work is free. You can redistribute it and/or modify it under the
  terms of the Do What The Fuck You Want To Public License, Version 2,
  as published by Sam Hocevar. See http://www.wtfpl.net/ for more details.
*/
#include <LiquidCrystal.h>
#include <Serial.h>

LiquidCrystal lcd(12, 11, 10, 5, 4, 3, 2);

/* The input data to the board */
String d_input;
int print_lcd = 0;

int led_pins[] = { 6, 7, 8 };
int led_state;

#define LCD_BACKLIGHT_PIN 13
#define LED_COUNT 3
#define BAUD_RATE 9600

enum SerialCommands {
    // LCD Cursor control
    LCD_SET_ROW_FIRST = 0x30,
    LCD_SET_ROW_SECOND = 0x31,

    // LED States
    LED_SET_BLINKING = 0x32,
    LED_SET_ALWAYS = 0x33,
    LED_SET_OFF = 0x34,

    // LED PINs
    LED_RED = 0x36,
    LED_YELLOW = 0x37,
    LED_GREEN = 0x38
};

void setup()
{
    // Init Serial
    Serial.begin(BAUD_RATE);

    // LCD Display initialization
    pinMode(LCD_BACKLIGHT_PIN, OUTPUT);
    digitalWrite(LCD_BACKLIGHT_PIN, HIGH);
    lcd.begin(16, 2);
    lcd.clear();
    lcd.setCursor(0, 0);
    lcd.print("Waiting...");
    lcd.setCursor(0, 1);
    lcd.print("for Input");

    // Activate all the LEDs
    for (int i=0; i < LED_COUNT; i++) {
        pinMode(led_pins[i], OUTPUT);
        digitalWrite(led_pins[i], HIGH);
    }
}

int command_mode = 1;
int last_led;
int last_led_state;

// Switch off all LEDs
void clearLEDs() {
    for (int i=0; i < LED_COUNT; i++) {
        digitalWrite(led_pins[i], LOW);
    }
}

void clearLCD() {
    d_input = "";
    print_lcd = 0;
}

/* Every input line to the board starts with a single character
   which acts as the command to be executed.
   In our case, these commands do one of the following
   - Set LCD cursor to corresponding row
   - Set the LED whose state has to be changed
   - Set the state of the LED
   Granted, we can have only 9 commands in this implementation ;)
*/
void execCommand(int command) {
    switch(command) {
    case LCD_SET_ROW_FIRST:
        Serial.print("Setting cursor to Row 0");
        lcd.setCursor(0, 0);
        break;
    case LCD_SET_ROW_SECOND:
        Serial.print("Setting cursor to Row 1");
        lcd.setCursor(0, 1);
        break;
    case LED_SET_BLINKING:
        // Cue the Knight Rider theme music
        digitalWrite(last_led, HIGH);
        delay(200);
        digitalWrite(last_led, LOW);
        delay(100);
        break;
    case LED_SET_ALWAYS:
        clearLEDs();
        digitalWrite(last_led, HIGH);
        break;
    case LED_SET_OFF:
        clearLEDs();
        digitalWrite(last_led, LOW);
        break;
    case LED_RED:
        last_led = 6;
        break;
    case LED_YELLOW:
        last_led = 7;
        break;
    case LED_GREEN:
        last_led = 8;
        break;
    }
}

void readSerial()
{
    if (Serial.available() > 0) {
        char recvd = Serial.read();
        /* The first character of each line to the board
           is the command to be executed
        */
        if (command_mode) {
            execCommand(recvd);
            command_mode = 0;
            return;
        }
        switch(recvd) {
        case '\n':
            Serial.print("Board received: ");
            Serial.print(d_input);
            // Setting this flag flushes the data onto the LCD
            print_lcd = 1;
            command_mode = 1;
            break;
        default:
            d_input += recvd;
        }
    }
}


void loop()
{
    readSerial();
    if (print_lcd > 0) {
        lcd.print(d_input);
        clearLCD();
    }
}

In Action

Here it is in action. As you can see, the LCD displays the Job, the last build number and its state. The wiring is a huge mess, but hey, it works! :)

Components used

  • Arduino UNO R3
  • 5 220-ohm resistors
  • 3 LEDs; Green, Red and Yellow
  • A bunch of wires
  • HD44780 16x2 LCD

Next step, maybe build a bigger housing for the entire system.

Comments